How We Managed 95+ in all Google Lighthouse Categories, Part 1 – Performance
Achieving a Google Lighthouse score of 90+ has become a personal goal for our website. It’s not that we care much about competition, but as a web development company, having a super-fast, well-ranking website does have its advantages.
Every client website we work on here at Mindshare gets a speed analysis. We strive for 80+ scores across the board for all new websites. But we haven’t paid much attention to our own site…until now, that is.
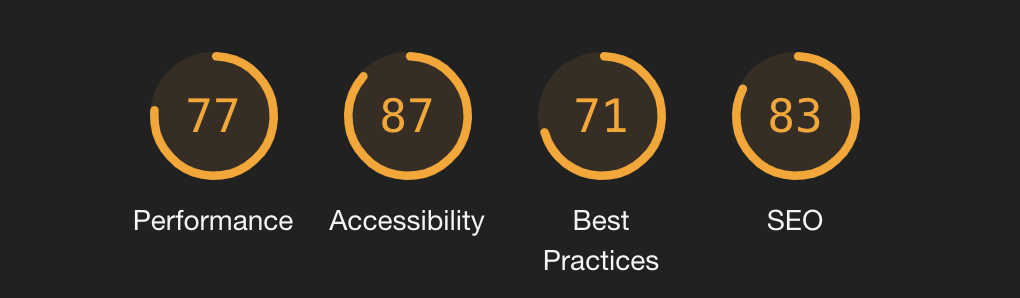
Google lighthouse measures website metrics in four categories, Performance, Accessibility, Best Practices, and SEO. Part 1 of this series will focus on performance.
Performance
The performance category was our main focus. Mindshare has a reputation for being an agency that focuses on fast, quality code. We wanted to make our website showcase our abilities.
Side note from owner James: WordPress often has a reputation for being slow, or “bloated.” But, when themes and plugins are built correctly, this is just not the case. Mindshare Labs is built on WordPress, and built correctly… so it’s fast and reliable.
There were two main items slowing us down in the Performance category:
1) Scripts
Script loading is often the major factor in the speed of a website and there were three things slowing down mind.sh/are
A) Bloated Script Bundles
In the past it was common for scripts to be minified, concatenated or otherwise combined into one. This makes for fewer server requests, but it also makes for huge files. These large files need to be downloaded, parsed, compiled, and evaluated by the browser before it can continue loading the page. Bundling javascript and css can cause other problems too; like the inability to separate scripts into the header or footer of a web page. It also means we cannot selectively load scripts only when they are needed.
We used two techniques to clean up our script loading:
Separate scripts and load them conditionally and appropriatly:
//Only enqueue template specific scripts on the template they apply to
if(is_page_template('page-template.php')) {
      wp_register_script('script-tag', 'script.js');
      wp_enqueue_script('script-tag');

      wp_register_script('another-script','other.js');
      wp_enqueue_script('another-script');
}
Take advantage of the script_loader_tag filter to add attributes.
//Add async or other attributes to selected scripts in wordpress
add_filter( 'script_loader_tag', function ( $tag, $handle, $src ) {
    // the handles of the enqueued scripts we want to add an attribute to
    $scripts = array('fontawesome');
    if ( in_array( $handle, $scripts ) ) {
      return '<script type="text/javascript" src="' . $src . '"  async></script>';
    }
    return $tag;
}, 10, 3 );
B) Unused Javascript and CSS
As many wordpress developers know, many WordPress plugins and themes introduce Javascript and CSS to cover every possible combination of content on their pages. This is one of the reasons why WordPress is so popular, it enables users to edit their websites however/whenever they want. Any type of content can go on any page. With the new Gutenberg editor this is even easier.
However, there is a downside to this style of development. If we allow any type of content to be on any page, then we need to include the necessary javascript and CSS for those elements on every page… or do we?
Since the release of WordPress 5.0 and the Gutenberg editor Mindshare has been developing themes and plugins with custom Gutenberg blocks. We do this very easily and reliably using a plugin called Advanced Custom Fields and it’s acf_register_block_type function.
acf_register_block_type(array(
	'name'              => 'block-slug',
	'title'             => __('BLock title'),
	'description'       => __('Block Description'),
	'render_template'   => get_template_directory().'/function-inc/block-templates/brand-color-blocks.php',
	'category'          => 'mapi-blocks',
	'icon'              => file_get_contents(get_template_directory_uri() . '/img/logo-sq.svg'),
	'keywords'          => array( 'Mindshare' ),
	'align'             => 'full',
	'mode'              => 'edit',
	'supports'	    => array(
	     'align'             => false,
	),
	'enqueue_assets' => function(){
	     //These scripts will only be enqueued when the block is in use
             wp_register_script('script-tag', 'script.js');
             wp_enqueue_script('script-tag');

	},
));
By using the ‘enque_assets’ argument we are able to add specific CSS or javascript to a page only when that block is in use. This enables incredibly fast websites and pages that only load minimal ‘foundational’ javascript and CSS.
C) Render Blocking Scripts
Render Blocking Scripts are scripts that keep the page from displaying until they are fully downloaded, parsed, compiled, and evaluated. This can include CSS and javascript. Since the beginning of web development, it’s been best practice to load foundational scripts in the header of the page and ‘nice to haves’ in the footer. This enables content to display before the page is fully loaded. However, it can cause a “jump” or the content to “move around” as those footer scripts load.
We take a unique approach to this and design our sites in a way that allows minimal header scripts to be loaded but also no content jumping or moving when footer scripts are loaded. We think of this as a secret sauce, but it’s really just responsible website design.
2) Images
Images are big and they take a long time to download. They can cause websites to be slow. But images also add much-needed visual reference and interest, and they help to break up content in meaningful, informative ways. So, how do we load them quickly? Two things:
A) Properly Size Images in Next-Gen Formats
Images come in pixel dimensions and the web pages they fit into are made up of containers. When an image is added to a web page, it is squashed or stretched into that container. So that image might actually be larger than it’s needs to be (or smaller which causes it to look grainy). A properly-sized image means the browser is only downloading what it needs.
Images also come in a variety of formats, the most popular are .jpeg and .png. However, both of these formats are quite large. Next generation formats like .webp and .svg are much smaller in file size and have much higher quality. We build websites to utilize these formats.
B) HTML5 Image Tags
A regular olde image tag provides one file for the browser to download:
<img src="/path/to/img.jpeg" alt="alternative name" />An HTML5 image tag provides a variety of sizes for the browser to choose from:
<img src="/path/to/image/image.png" alt="alternative-name" loading="lazy" srcset="/path/to/image/image.png 416w, /path/to/image/image.png 300w, /path/to/image/image.png 1024w, /path/to/image/image.png 768w, /path/to/image/image.png 1536w, /path/to/image/image.png 550w, /path/to/image/image.png 1600w, /path/to/image/image.png 2000w" sizes="(max-width: 416px) 100vw, 416px">Using modern HTML5 and the srcset attribute, we’re able to take advantage of modern browser technology. Using this method, the browser can download the image that best fits the container provided. This allows for more responsive applications as well. On a mobile device, that container might be smaller than on a desktop. On a retina display (looking at you Apple), the browser might choose to download the larger image so it appears nice and crispy.
TLDR;
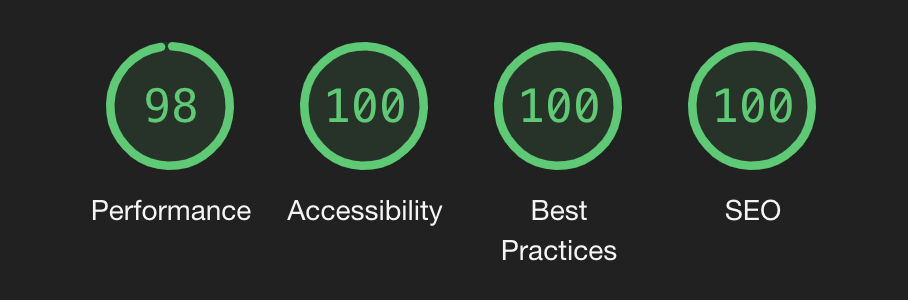
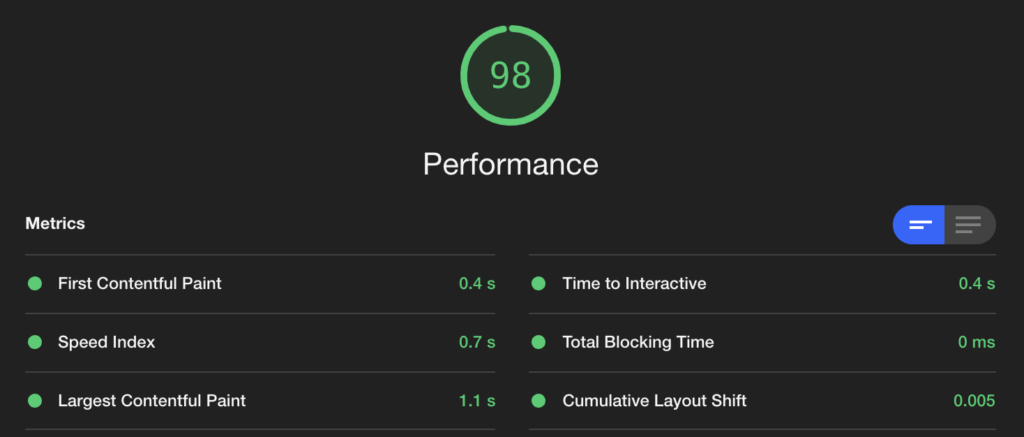
Using built in WordPress functions and responsible website development. we improved our Google Lighthouse performance score from 77 to 98.
Keep an eye out for parts 2-4 where we talk about Accessibility, Best Practices, and SEO.